The Anki @ Geisel manual
Welcome to the Anki @ Geisel student curriculum! Here you will find everything you need to incorporate spaced repetition software in the Foundations course and beyond. Happy studying!
New to this, or coming back mid-year? Jump straight to your stage — otherwise, read on.
What is Anki — and should you use it?
Anki is a flashcard program built around spaced repetition: instead of reviewing everything every day, it shows you each card right before you're about to forget it. Cards you find easy come back rarely; cards you struggle with come back often. Over months, this is dramatically more efficient than re-reading notes.
How it works
- You see a card, try to recall the answer, then grade it: "good" or "again"
- Anki schedules the next review several days, then weeks, then months out.
- The harder a card is for you, the sooner it returns; the better you know it, the longer it waits.
That's the whole idea.
Why it's worth the setup cost
Medical school is often a volume problem: there are thousands of discrete facts that have to stay retrievable for years. Foundations is just the start of a long journey through Step 1 and 2, shelf exams, and the wards. Re-reading and note-taking doesn't scale like spaced repetition does. The cards you import day one can still be working for you come Step 1.
Anki is excellent at retention but not at synthesis. Use it to lock down facts so your brain is free to do the connecting. If you can't explain a concept out loud, more reps won't fix that.
Before you start
- Consistency is the key. The pace of medical school is too fast to do Anki only on occasion. Spend at least 15 minutes/day to prevent decay, but the average will be ~1-3 hours.
- Anki is hard. It's boring, it looks plain, and it doesn't try to win you over. It makes remembering things easy, and that's it.
- Anki is not enough. You still need a scaffold connecting distant pieces of information. If you can't explain it, you don't understand it.
- Your knowledge base is iterative. Consistent, long-term Anki makes Step exams, shelf exams, and clerkships far easier.
The first two weeks feel pointless. That's normal. The daily pile is tiny, the payoff is invisible, and it's tempting to conclude it isn't working. It is — spaced repetition pays out on a delay, and the reviews you bank now are what make Benchmark exams and, later, Step 1 dramatically lighter. Don't judge Anki by week one. Judge the habit by whether you still have it in month three.
Start here
Still in? Work through these six steps in order — the first pass takes about an hour, and after that Anki is a daily habit, not a project. Do everything on a computer; the phone/iPad app and add-ons can wait, so they're not on this list.
- Install AnkiThe free desktop app
- Make an AnkiWeb accountFree cloud sync across devices
- Import the Foundations deckLecture-aligned, ready to study
- Confirm the preset importedOne quick check — not a from-scratch setup
- Turn on FSRSThe one setting the deck can't carry for you
- Learn the daily workflowThe habit that makes it all work
Installation
Day 1 is a short setup you do once, on a computer. The essential path is three steps here — install the app, make an account, learn to sync — after which you import the deck and learn the settings. Budget about an hour. It's free: the desktop app and syncing cost nothing. The iPhone/iPad app is an optional one-time purchase you can skip today, and add-ons can wait too.
1. Anki Desktop
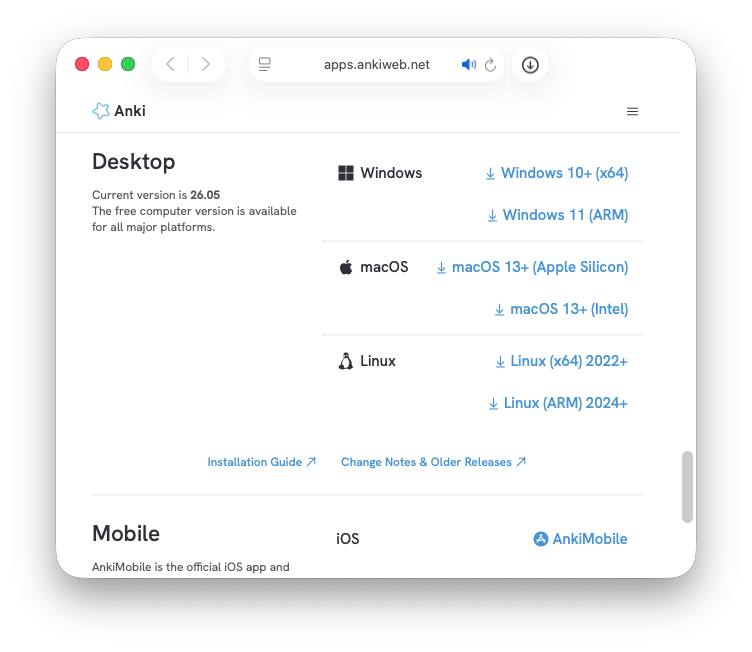
Download Anki from apps.ankiweb.net. It's free and runs on macOS, Windows, and Linux.
Get it from apps.ankiweb.net — not an app-store search. There are lookalikes with deliberately similar names.
Your computer may warn you before opening an app downloaded from the internet. As long as you are using the genuine Anki website, it is safe.
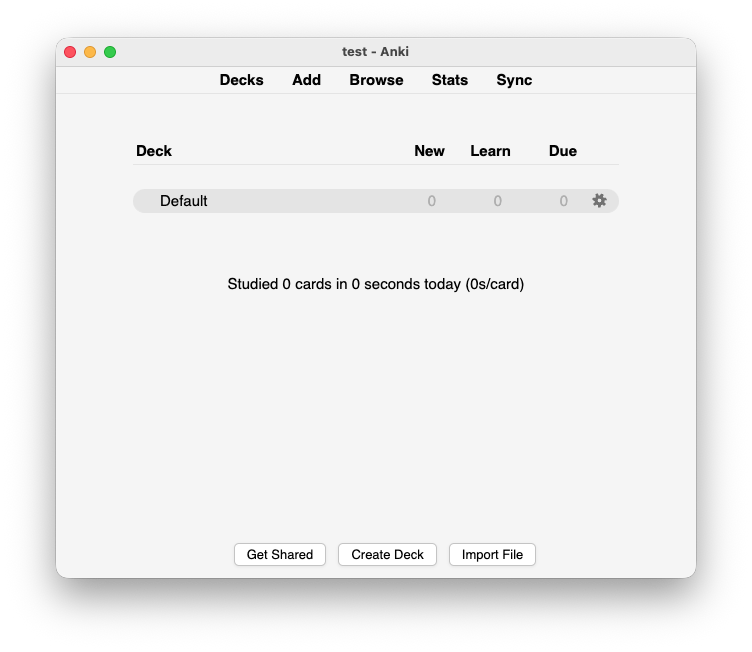
You're set when Anki opens and shows an empty deck list.
2. An AnkiWeb account
Create a free account at ankiweb.net. AnkiWeb keeps a copy of your collection in the cloud so it syncs across devices. Back in the desktop app, click Sync (top-right) and log in with that account.
You're set when you've signed in and the Sync button shows no error.
If you ever hit a sync conflict. The Sync button normally does a "smart" two-way sync, so you rarely think about direction. If a conflict does come up, you'll see two options:
- Upload to AnkiWeb — overwrites the copy on AnkiWeb with what's on this device. Use this when you're sure this device has your most recent, correct data and you want to force it to be the source of truth.
- Download from AnkiWeb — overwrites what's on this device with the copy from AnkiWeb. Use this when this device is out of date or wrong, and AnkiWeb has the version you want to keep.
Both are destructive in one direction — whichever side you don't choose gets discarded. Only reach for them deliberately, when you know which copy is right; for everyday use, the plain Sync button is what you want.
3. Sync, every time
The golden rule: sync before you start, sync when you finish. Editing the same collection on two devices without syncing in between is the one reliable way to create conflicts. For Day 1 that's the whole story — press Sync and you're done.
Note that collection data (cards, scheduling) syncs almost instantly, but media (images, audio) syncs separately and can take longer to catch up — especially the first sync after importing a big, image-heavy deck. If a card looks like it's missing an image right after importing or switching devices, give the sync a bit more time before assuming something's wrong.
4. Mobile — optional, skip on Day 1
You don't need this to start, and it's easy to add later. When you want it, install the app for your device, sign into the same AnkiWeb account, and your decks sync automatically.
| Platform | App | Cost |
|---|---|---|
| iOS / iPadOS | AnkiMobile | Paid (one-time; funds development) |
| Android | AnkiDroid | Free |
The Foundations deck
A lecture-aligned deck for the Foundations course — this is the one to start with as an M1. It mirrors the curriculum, so you study exactly what you've had in class and nothing you haven't.
Download
- Foundations — full course
Import it
Double-click the .apkg file, or in Anki use File → Import and ensure you import the preset. The full Geisel Foundations hierarchy appears in your deck list with every benchmark and lecture as a subdeck. You're set when the Geisel Foundations tree shows up in your deck list.
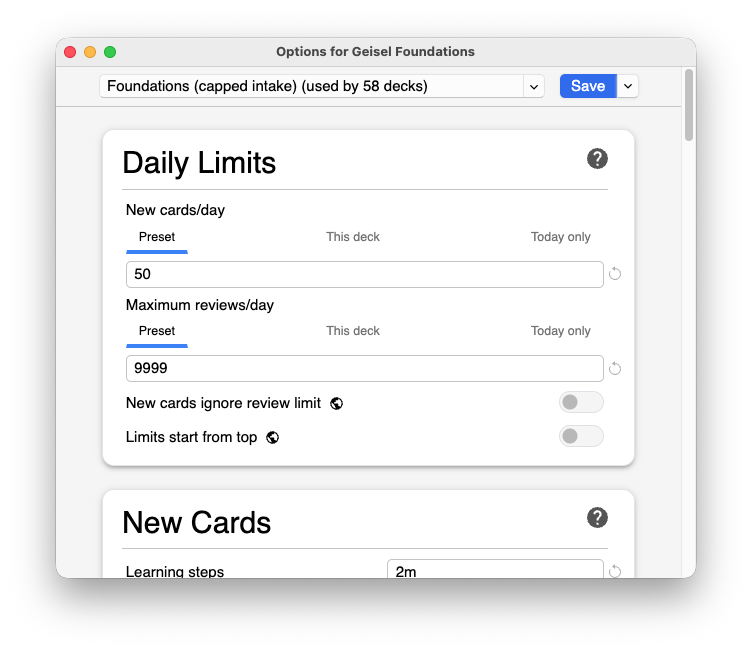
One thing not to skip: these decks rely on an imported deck preset, so make sure it comes across. The preset is bundled in the .apkg and applies during a normal import. Confirm it took by opening any subdeck's options: it should show Foundations (capped intake) (see Deck settings), not Default. If it shows Default, the preset didn't import and your new-card cap and retention will be wrong until you reattach it.
How the deck is organized
Cards live in a nested hierarchy that mirrors the course, so you can study or suspend any slice of it:
Geisel Foundations
└── Benchmark N
    └── Week N
        └── <MMDD>_<lecture title>
Within each week, lecture subdecks are prefixed with the date the lecture is taught, not a lecture number:
Week 1
├── 0801_Introduction to Protein Structure
├── 0803b_Introduction to Medical Pharmacology
└── 0810_Introduction to the Circulatory, Digestive & Urinary Systems
That date prefix sorts the tree into teaching order: when you study the top-level Geisel Foundations deck, the day's new cards come out in the order you actually see the material in class. You never pick a subdeck; the prefix does it for you. (See the basic workflow for why this matters.) Same-day lectures get a letter suffix (0803_, 0803b_, 0803c_).
Cards also carry a flat lecture::<lecture title> tag with just the lecture name, and a subject::<longitudinal curriculum> for focusing on particular threads. For normal studying, the subdecks are all you need.
FSRS
FSRS (the Free Spaced Repetition Scheduler) is the modern scheduling algorithm built into Anki. It schedules more accurately than the old SM-2 algorithm, which means fewer wasted reviews for the same retention. You will need to turn it on yourself (see below).
Why it beats SM-2
SM-2 uses fixed multipliers (the old "ease" system) and tends to drift — cards pile up or arrive too early. FSRS models your actual forgetting curve from your review history and schedules each card to hit a retention target you choose. In practice: similar memory, meaningfully less time.
Enabling it
- Open any deck's options (gear → Options).
- Find the FSRS section and toggle it on (this applies collection-wide).
- Check that desired retention reads 0.85. You're aiming to remember ~85% of cards at review time; trust me, you do not need to go higher than this to achieve good results. Retention is the single biggest lever on your daily review count: on a deck this large, 0.85 rather than the more common 0.90 meaningfully cuts the review load, which is the right trade for a pass/fail course where consistency matters more than squeezing out the last few percent of recall. Don't chase the decimals; just be consistent.
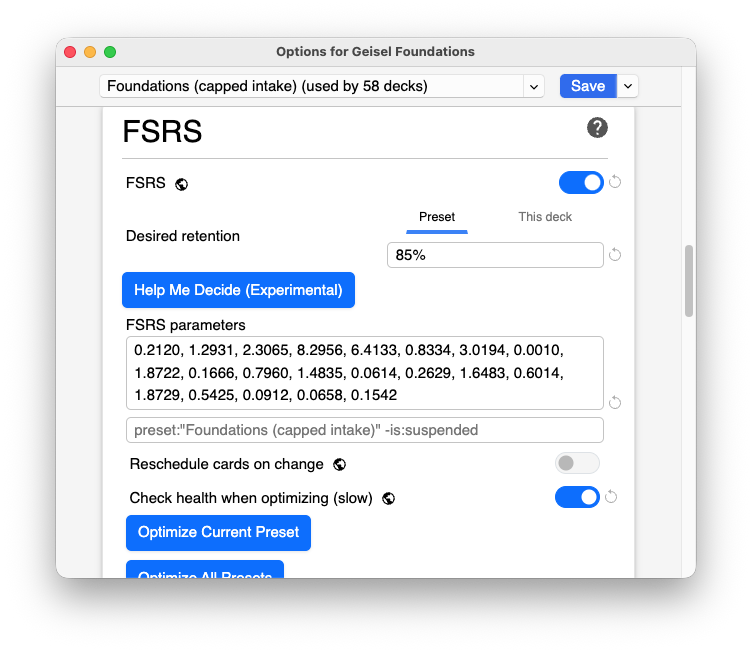
You're set when the FSRS box is ticked and desired retention shows 0.85.
Optimizing
Once you have a few weeks of review history, click Optimize in the FSRS settings to recompute the parameters from your own data. Re-run it every month or two. That's the entire maintenance burden.
That's the whole setup — Anki runs, your deck is loaded, and FSRS is scheduling. What you do next depends on where you are in the year:
Nothing more to do
You're fully set up. Bookmark this page and we look forward to seeing you soon! Do NOT pre-study for Foundations; enjoy your freedom. Nerds can look at the deck settings, add-ons, and using a remote controller.
Learn the basics
First, learn the daily workflow of Anki, and of Foundations specifically. Then, read the Tips and Tricks section. And finally, join the struggle of striking the fine balance of reviewing and adding new cards.
Prepare for Phase 2
Pick up the Anatomy deck and the AnKing deck in the supplemental decks section, importing with their pre-installed presets. Read about how the settings change after foundations. Then, learn how to use the Anatomy deck and transition to the AnKing deck.
Your Foundations study loop
In Foundations right now? This chapter is the part to live in — read it once, top to bottom (it's short), and you'll have the whole daily practice. Here's the shape of it, in order:
- The daily habit — reviews versus new cards, how to grade, and the two-minute mechanics of a review. General to all of Anki.
- How it works in Foundations — one deck and one button, the daily cap, staying on pace, studying a single lecture, and prepping for a benchmark.
- The tips and the balance to strike — the handful of habits that decide whether this works, and how hard to push on a pass/fail course.
That's the core, and all of it lives right here in this chapter. Everything past it is optional or on-demand: dip into card limits when reviews start to feel too light or too heavy, add add-ons or a game controller if you want to, and leave After Foundations until the course actually ends.
Daily workflow
The habit is what makes Anki work.
Every day
Two things bookend every session no matter what: sync before you start, sync when you finish. In between, you're juggling two kinds of cards — reviews (what Anki predicts you're about to forget) and new cards (from lectures you've had) — and the central skill of daily Anki is deciding how to split your time between them. This is the tension worth understanding before anything else:
- Reviews are knowledge you've already banked, now decaying. Skip them and something you'd learned slips away — and a card you let lapse costs several future reps to rebuild. But the cost is recoverable: the card waits for you, and you can always catch up after an exam.
- New cards are information you haven't met yet. Their deadline is harder: you can't reap the benefit of material on a test you've already taken. A new card unseen before the exam is an opportunity that's simply gone — you can't retroactively have studied it.
So neither half is "the non-negotiable one." Reviews have a floor you shouldn't drop below — letting the whole pile rot to chase new cards trades locked-in knowledge for shallow first exposure. New cards have a deadline you can't ignore before an exam. But remember! On a pass/fail course you don't need to see every card to pass...so the goal is not to "finish everything" but is to keep reviews above their floor while getting enough new material in before each test. How to strike that balance is the whole game; the next section describes the strategy.
That tension plays out in how you order a session. Three common approaches:
- Reviews first, then new (the safe default). Clear reviews first thing — ideally before class, when you're freshest and have a set end-point — then add new cards with the time and energy left. This protects the review floor automatically: the expensive-to-recover half gets done first, and new cards absorb the slack. When you're unsure, do this.
- Mixed in one sitting. Study straight through and let Anki interleave the two. Simplest, and fine when your daily load is light enough that you finish. The risk on a heavy day is running out of steam with reviews left unfinished — the costly half to drop.
- New cards first (deliberately, not by default). The one time the deadline outranks the floor: a big exam looms and there's lecture material you simply haven't seen yet. Front-loading new cards then is a reasonable call — but it's a conscious trade for a specific week, not a daily habit, because most days the review floor is the thing actually at risk.
The order matters far more on heavy days than light ones — when everything gets finished anyway, it's moot.
Balancing new vs. reviews
To elaborate on the tension described above: Anki tries to catch each card when your recall probability drops to about 85%; that's when it becomes due. An overdue card is more likely already forgotten — and a card rated Again has its interval reset to zero.
Picture a card whose interval has stretched to 21 days: review it on time and there's an ~80% chance you extend it past a month. Let it slip a few days and recall may have decayed to ~60%, so you fail it, the interval collapses, and you'll see that card three or four more times over the next month.
Across hundreds of thousands of reviews that difference is brutal. So: yes, add new material aggressively given how little time sits between exams — but the long game is delaying forgetting, and that's why reviews get a floor rather than being the first thing sacrificed.
If you fall behind
Don't clear a giant backlog in one sitting. Set new cards to 0 for a few days, knock the reviews down in chunks, and turn new cards back on once the pile is under control. A backlog is recoverable; quitting over one isn't. At minimum, do the cards due today — see "Catching Up" in the Anki Manual.
How to actually review a card
This sounds too obvious to say and is the single most-skipped step: try to answer before you flip. Look at the front, commit to a real answer — say it out loud, or at least form the whole thought — and only then reveal. The entire mechanism is the effort of retrieval; a card you passively read and nod along to buys you almost nothing, however many you get through. If you catch yourself flipping on reflex before you've recalled anything, slow down. Ten cards done properly beat a hundred skimmed.
Two things keep it honest: cover the answer until you've committed, and on a cloze with several blanks, make sure you can produce every blank, not just the easy one — miss one and that's an Again. This is what "grading honestly" below actually depends on: you can't grade a recall you never attempted.
Grading honestly
Use Again when you didn't recall it, even if it was because you were unfocused or had a brain fart. Grade Good when you did recall it, even if it was a lucky guess (subconscious associations are big with Anki!). Pressing Good on a card you blanked just guarantees you'll blank on it again, as it will get pushed out too far; hitting Again when you got it correct will only lead you to see cards that you know well more frequently (you should see them less).
IMPORTANT: Reaching for Easy or Hard to hand-tune intervals will backfire and distort your algorithm.
Keep it simple, stupid: just use Again and Good.
Keyboard shortcuts worth knowing
You need very few. These cover almost an entire session without touching the mouse:
| Key | Does |
|---|---|
| Space (or Enter) | Show the answer — then press it again to grade Good. Your two most-used presses are the same key. |
| 1 / 2 / 3 / 4 | Again / Hard / Good / Easy. Stick to 1 and 3 — see grading honestly. |
| e | Edit the current card — fix a typo or reword it on the spot. |
| Ctrl/Cmd + 1–7 | Flag the card a color, so you can find it later for an error report. |
| * | Mark the note (adds a marked tag) — a searchable, more permanent flag. |
| @ | Suspend the card — pull it out of rotation until you unsuspend it. |
| - | Bury the card — hide it just until tomorrow. |
| Ctrl/Cmd + Z | Undo — including a grade you fat-fingered. |
These are desktop defaults and are all remappable in Tools → Preferences. On mobile you use gestures instead. If a key does nothing, the review window probably isn't focused, or an add-on has claimed it.
Studying Foundations
The daily workflow, applied: one deck, worked through once a day — or split into two short sittings if that suits you.
The basic workflow: one deck, one button
You do not need to pick a subdeck, choose an order, or touch filtered decks. Study the top-level Geisel Foundations deck and let it do the sorting:
- Study the parent deck by default. When you open
Geisel Foundationsat the top of the tree, Anki hands you the day's cards — your due reviews and your capped new cards, mixed together, with new cards in date-prefixed teaching order. You don't normally pick a deck — though studying one lecture's subdeck is a fair move in specific spots (see studying one lecture on its own). - Leave reviews and new interleaved — that's the right default. You don't gate one behind the other, and you don't need a setting to order them. A mixed queue means a short day costs you a little of each rather than wiping out one half entirely. Reviews-first is still a fine habit (see a daily rhythm below), just not something you enforce.
- The 2,000-card count is not your problem. The number on Day 1 looks alarming, but your new-cards cap makes it inert — Anki hands you your daily limit and holds the rest back. You are looking at today's cards, not the whole deck.
- That's the entire basic workflow. Open the parent deck, work through what it gives you, sync. No rebuilding, no queries, no card-state qualifiers. If you want the flexible power-user path instead, see Filtered decks.
- On timing: you'll almost never sit exactly on the lecture calendar — a fixed daily cap against uneven lecture sizes keeps you a little ahead on light stretches and a little behind on heavy ones, by design (see below). Don't chase being perfectly current; whether you run a lecture's cards before class (better prep) or after (more right, faster) is your call.
Light weeks, heavy weeks, and staying on pace
This is the part that quietly trips people up, so it's worth being exact. Studying the parent deck always hands you the oldest cards you haven't seen yet, in curriculum order, up to your 50 a day — it tracks where you are in the deck, not what the calendar says. So "today's 50" only means "today's lecture" while you're caught up. As lecture sizes swing, that cuts two ways:
- A light lecture runs you ahead. With fewer than 50 cards in it, the gather spills into the next lecture to fill the day, so you meet a little material before class covers it — the automatic version of front-loading. Fine; grade it normally and carry on.
- A heavy stretch pushes you behind class. When lectures run past 50 cards a day (heavy days hit 50–150), the parent still feeds only 50 — so the cards you see are the ones you owe from earlier, while the newest lectures wait their turn. You're not doing it wrong; you're clearing the queue in order, which is exactly what the parent is for.
Left alone, this self-corrects over a benchmark: heavy weeks put you behind, light weeks spill forward and pull you level, and ~50/day averages out to roughly the whole deck by exam time. What it does not guarantee is the "within 24 hours" ideal during a heavy run — and that's fine, because on a pass/fail course, seeing every card the day of its lecture was never the goal.
If you'd rather stay level with class through a heavy stretch than wait for it to even out, spend more new-card budget when you have the capacity: raise new cards/day on a lighter week to bank a cushion, or study a single lecture on its own to clear a big one in a sitting. And 50 is only a conservative starting point — if your daily review load feels comfortable, there's no reason not to run a higher standing limit (say 60–75) and simply see the deck faster. The 50 is a floor you can lift, not a wall.
Studying one lecture on its own
The parent deck is the default, but pointing yourself at a single lecture's subdeck is a legitimate move when you want to choose which lecture's new cards you take today instead of accepting the oldest-first order. Say a 20-card lecture is immediately followed by a 150-card one: left to the parent, today's 50 would be all 20 of the small lecture plus 30 of the big one. If you'd rather put the whole 50 into the big lecture and pick the small one up later, open that subdeck and study it — the 50/day cap still applies, so you take 50 new from it, and the small lecture resurfaces on the parent another day. To clear a whole big lecture in one sitting instead, lift the cap first: set new cards/day to 9999, study the subdeck, then set it back to 50.
Two things to know before you study a subdeck. A subdeck shows you only its own due reviews — every review waiting in the rest of Foundations stays hidden while you're inside it, so studying a subdeck is never a substitute for your daily reviews. And the new-card cap is shared across the whole tree, so once you've taken your 50 from the subdeck the parent has none left to give today. Hence the rule that keeps you safe: when you've finished the subdeck's new cards, go back to the parent Geisel Foundations deck and clear your reviews there. The parent won't hand you more new cards — you've spent the day's budget — but it's the only place your full review pile appears.
If you lifted the cap, set it back to 50 when you're done and the one-button parent flow resumes. (Power users can target a lecture with a filtered deck instead — deck:"Geisel Foundations::…" is:new pulls only its new cards and leaves your reviews on the parent; see Filtered decks.)
A daily rhythm (optional)
Plenty of students split the day into two short sittings, and it's a good habit — but a habit, not a rule the deck enforces:
- Reviews while you're fresh — ideally before class, so you have a fixed endpoint and clear the expensive-to-recover half early.
- New cards later, with whatever time and energy is left over.
All you're doing is choosing which pile to open when — there's nothing to configure, and you shouldn't configure it. Want a pure reviews-only sitting? Set new cards/day to 0 for it and study the parent. Want new cards first in an exam week? Do them first, or straight from the subdeck. Otherwise the honest default is the one-button flow: open the parent, work through the mixed queue, done.
Anki does have a setting that forces reviews before new (Options → Display Order → new/review order → Show after reviews) — but leave it off. It also holds back every new card until you've cleared every review, so any day you don't finish reviews shows zero new cards, quietly trading away lecture material you may not get back before the exam. Keep the queue mixed and let reviews-first stay a habit.
Reviewing for a benchmark
Study the whole Benchmark N deck in the days before the exam. Your due cards surface naturally — you don't need to build anything special for that.
For a pure cram of a benchmark's material regardless of schedule, build a filtered deck:
- Search:
deck:"Geisel Foundations::Benchmark 1" (is:due OR is:new)— the card-state qualifier matters; without it a filtered deck pulls in a way you didn't intend. - Reschedule cards based on my answers: OFF — so the cram doesn't distort your real intervals.
See Filtered decks for the mechanics and the card-state trap.
Tips & strategies
The deck and settings get you started; these habits are what make it work.
- Start early and stay consistent. The single biggest predictor of success. A missed weekend hurts more than a missed day.
- The algorithm doesn't stop scheduling because your brain doesn't stop forgetting. You cannot pause nor delay without consequence.
- Don't add new cards too fast or too slow. Too many buries you in reviews; too few and you fall behind lecture. Tune new cards/day so reviews stay manageable but you keep pace.
- Make the cards your own. Edit freely. A card you've personally reworded sticks better than one you passively read — and your edits survive deck updates.
- Use the Extra field for your own notes. A link to a slide, a "don't confuse this with…", the way a professor framed it; turn a generic card into your card.
- Understanding and memorizing feed each other. Anki isn't the step after understanding, but a useful tool to help you get there. A primed fact is the hook that a lecture, some sleep, and omnipresent practice questions hang synthesis on. The act of retrieving a card strengthens the concept, not just the recall. What Anki can't do is build the connections for you. So don't stop doing cards until you "understand," and don't mistake a card you can pattern-match for one you actually know. If you're completing a cloze without knowing what the term means, that's the signal to go connect it to the bigger picture, then keep reviewing. For this, the Wikipedia add-on can be a useful and quick reference.
The balance to strike
Foundations is pass/fail. That single fact should change how you study, and it's worth internalizing early because it stays true through all of preclinical.
You do not need to finish this deck to pass. You do not need to master every card. The deck is a tool, not a checklist — and the material that matters most recurs across lectures and benchmarks, so the high-yield content gets reinforced whether or not you personally carded every lecture. Nobody grades your completion percentage.
But returns on study time diminish. The first few hours a day buy you most of what a pass requires. The climb from a comfortable pass to near-perfect recall costs disproportionately more, and it buys you a distinction on a test that only records pass. You can spend nearly all your waking hours studying and approach 100%. Or you can study enough to comfortably clear the bar, and spend the hours you saved sleeping, exercising, seeing people you like, doing research, keeping a hobby alive, etc.
The catch: "you don't need to finish" is not "you can fall behind." The one habit that actually protects your pass (and your time!!) is consistency. A little every day beats infrequent bursts. Drop the completion target, and keep the daily habit. The balance is enough, every day.
And that's the entire daily practice — read once, it carries you through the whole course. Nothing below is required to study well: Settings & upkeep is there when you want to tune something, Optional extras if you like them, and After Foundations for when the course wraps up.
Deck settings
The Foundations deck ships with a recommended preset already attached — an options group named Foundations (capped intake) bound to every subdeck. New cards/day, max reviews, and desired retention are set for you. You don't need to configure them from scratch; you need to do one thing the export can't carry (turn on FSRS, back in Day 1 setup) and then it's worth understanding what the preset did so you can adjust it and know the settings for future decks.
If you imported into a fresh collection (the usual Day-1 case), the preset comes in clean. If you imported into a collection that already had decks, Anki may rename the preset to avoid a collision, or not make it the default — so open the options once and confirm the values below are what's actually applied.
What the preset sets, and why
Open any Foundations subdeck's options (gear icon → Options) to see these. The two that carry the most weight:
| Setting | Foundations value | Why |
|---|---|---|
| New cards/day | ~50 | Each new card becomes ~8–10 reviews over the following weeks. Foundations is a large pre-built deck under time pressure, so an intentional cap is how you keep the daily load survivable — see the note below on why this deviates from the usual advice. |
| Maximum reviews/day | 9999 | Never cap reviews — you want to clear the whole due pile each day. |
| New card gather order | Deck, then random notes | Walks the deck tree top to bottom, so lectures surface in their date-prefix teaching order, while picking cards randomly within each lecture. |
| New card sort order | Order gathered | Keeps the sequence the gather step produced, rather than re-sorting it. |
Because the preset is attached to the parent Geisel Foundations deck and shared down, changing a value once applies it to every subdeck. You can raise new cards on lighter weeks; it's far easier to add than to dig out of a backlog.
The two ordering settings are what make the one-deck-one-button workflow work, so they're worth understanding rather than just trusting. Together they mean your daily new cards arrive lecture by lecture in the order you were taught — but shuffled inside each lecture. That inner shuffle is deliberate: it stops you from learning a card by its position ("the third card is always the one about X") instead of its content, without disturbing the across-lecture curriculum order the date prefixes exist to protect. If you ever find new cards arriving out of teaching order, these are the settings to check first.
Presets vs. per-deck options
Anki groups settings into presets (options groups). A preset can be shared by many decks — change it once and every deck using it updates. For Foundations, keeping all subdecks on one preset is simplest, so a single change to "new cards/day" applies everywhere.
When working with subdecks or creating new decks, the "Default" settings will apply automatically. To apply a preset across all subdecks, from the Options menu, click the arrow to the right of the "Save" button and select "Save to all subdecks."
You'll need this when a subdeck falls out of sync with the rest — say you experimented with one lecture's settings, or a newly imported deck update attached its own preset instead of joining the shared one. Open the subdeck's Options, confirm the values are right, then use the Save arrow → Save to all subdecks to push that same preset down the whole tree in one step, rather than opening each subdeck individually.
Finding your Card Limits
Reviews should always be uncapped at 9999 per day, full stop. New cards are different: there's no universal number, because the right cap depends entirely on the material itself.
Intake (i.e. New Cards) should track your learning. This is a delicate balance, as the rate at which new cards are added directly relates to the number of daily review cards. You are aiming to balance a manageable daily review load while maximizing the number of new cards added.
Foundations is discrete. It's 2,000+ cards handed to you on Day 1, all at once. Uncapped new cards here wouldn't track your learning pace — it would just dump 50–150 new cards on a heavy lecture day. A cap isn't fighting the scheduler's assumptions; it's converting a firehose into a rate you can sustain.
So for Foundations, deviate deliberately:
- Set a cap you can sustain every day — around 50 if you want to see the whole deck, lower if that buries you in reviews. Set it on the parent
Geisel Foundationsoptions group so it governs all subdecks at once. - Treat the cap as a floor you may raise, not a target you must hit. On a light lecture week, raise it to get ahead of a heavy block coming up — the same idea as front-loading before big lectures.
- The cap protects new cards, not reviews. If you fall behind, the danger is the review pile, not the new pile. Set new cards to 0, clear reviews in chunks, then turn new cards back on. A cap is not permission to let a backlog grow - see "Catching Up" in the Anki Manual.
AnKing works differently — it has no date-prefixed subdecks to pace intake for you, so you supply the structure yourself: either drive studying through filtered decks, or pull tags into your own capped subdecks. See the AnKing strategies.
Settings beyond Foundations
The Foundations preset is tuned for one specific structure: date-prefixed subdecks that double as a pacing mechanism. Studying the parent deck already gathers new cards in teaching order, so a simple new-cards cap turns a 2,000-card deck into a survivable daily rate. Later, when you move to a deck like AnKing — one enormous pile organized by tag, with no lecture subdecks — that mechanism disappears, and settings have to adapt:
- Foundations — cap new cards (~50); the subdeck order sequences them for you. Reviews stay at 9999.
- AnKing — no subdeck order to lean on, so you supply the pacing: pull cards by tag through filtered decks, or move tags into your own capped subdecks (see the AnKing strategies). ~40–80 new/day is a common range if you use a cap. Reviews still 9999.
Reviews stay uncapped either way; what changes is how you throttle new cards, because that depends on whether the deck hands you a study order or leaves you to build one from tags.
Keeping your deck updated
The deck improves over time as students report errors and contribute cards — see Contribute. Pulling a new version costs you nothing: your review history stays intact.
How to update
Download the latest .apkg from this site and import it over your existing deck (File → Import). You don't need to delete the old deck first — just import over it.
Why your progress survives
Anki tracks each note's identity internally. When you import a newer version of the same deck, it recognizes notes it's seen before and updates them rather than creating duplicates — as long as the note type hasn't changed. That's why:
- cards you've already studied keep their scheduling (intervals, history),
- cards you don't have in your collection yet are added,
- cards that were corrected are updated in place.
Nothing about cards you've already studied is ever deleted by an import. Watch for announcements from the maintainers when a new version ships, and if you spot something worth fixing yourself, see Contribute.
Add-ons
Add-ons extend Anki to gamify, add statistics, or otherwise improve the experience. Install from Tools → Add-ons → Get Add-ons (Cmd/Ctrl+Shift+A), then paste the add-on's code — find each by searching its name at ankiweb.net/shared/addons. Restart Anki to launch new add-ons.
Add-ons are desktop-only. They don't run on AnkiMobile or AnkiDroid. Anki changes over time and add-ons can break — a frequent source of confusion, but easily fixed once identified.
Worth installing for function
- Color Confirmation — flashes a box in the color of the button you pressed.
- Hierarchical / Colorful Tags — makes nested tags collapsible and color-coded.
- Contanki — game-controller support (the 8BitDo Micro 2 is the common pick, but any programmable controller works).
- WikiLookup — look up a highlighted term inline by pressing W, without leaving the card.
Advanced / situational
- AMBOSS — links cards to the AMBOSS library; strong but likely overkill for preclinical years.
- Speed Focus Mode — beeps after a timer to keep you at pace; can backfire while you're still unfamiliar with cards.
Sprucing up the place
- Custom Background Image and Gear Icon — cosmetic customization.
- Review Heatmap — a calendar of your activity; good for accountability, but anxiety-provoking for some.
- More Overview Stats and Search Stats Extended — deeper statistics than the built-in screen.
- Anki Leaderboard — compete with friends (but remember, quality of review >> quantity or speed!).
- Modern Stats Dashboard — a statistics oriented dashboard.
- Minimalist UI — a simple dashboard.
Studying with a controller (Contanki)
You can drive Anki with a game controller instead of a keyboard and mouse. The add-on that makes this work is Contanki. Be honest with yourself about what this buys you, though: a controller makes reviewing more comfortable, not more effective. Same rule as everywhere in this manual — quality of review beats speed. If a gamepad keeps you doing your reps daily, it's worth the cost; but if it turns reviews into a button-mashing game where you stop reading the card, it's counterproductive.
Contanki is an add-on, so it's desktop-only — it doesn't run on AnkiMobile or AnkiDroid. The phone and tablet apps have their own, separate controller support that you set up differently; see On the phone or iPad below.
Picking a controller
Almost any modern gamepad Contanki recognizes will work — Xbox, PlayStation (DualShock 4, DualSense), Switch Pro, a cheap generic pad.
Among med students the popular choice is one of 8BitDo's pocket-sized controllers, because they're tiny, cheap, and pair over Bluetooth: the 8BitDo Micro (~$25) and the 8BitDo Zero 2 (~$20).
1. Install Contanki
Same as any add-on: Tools → Add-ons → Get Add-ons (Cmd/Ctrl+Shift+A), paste the code, and restart Anki.
Contanki needs a reasonably current Anki (2.1.66 or newer). If you're on an older Anki, older Contanki builds are on the project's GitHub, but updating Anki is the easier path.
2. Connect the controller
Plug the controller in over USB, or pair it over Bluetooth, then open Anki and press any button. Contanki detects the controller, loads a sensible default mapping for it, and you can start reviewing immediately. If a button-press does nothing, jump to Troubleshooting — it's almost always a controller-mode issue.
The 8BitDo mode gotcha
8BitDo controllers can pretend to be several different devices — Xbox, DirectInput, Switch, macOS, or a plain keyboard — and which mode they're in changes whether Contanki sees them correctly. Get the mode right. Contanki's general guidance is to put 8BitDo pads in Xbox mode.
Pairing, by platform (desktop)
Modes and button combos vary by model, so treat this as the shape of the process rather than exact steps for your pad — the 8BitDo Micro is used here as the worked example. For other models or the full picture, 8BitDo's per-model manual and the AnKing's controller walkthrough are the references.
| Platform | 8BitDo Micro — pair & connect |
|---|---|
| macOS | Slide the bottom switch to D. Press Home (heart), then hold the small Pair button ~1s until it's discoverable, and connect from macOS Bluetooth. |
| Windows | Same as macOS: D mode → Home, hold Pair ~1s → connect from Windows Bluetooth |
Once paired, open Anki and press any button so Contanki picks it up, then move on to mapping.
3. Map your buttons ("coding" the controller)
Open Contanki's config from Tools (or via Tools → Add-ons → Contanki → Config). If your controller isn't shown, press a button on it so it registers. The pieces worth understanding:
- Per-context bindings. You can map buttons separately for each screen — Review, Deck Browser, and so on — plus a set of global bindings used as a fallback when a screen has nothing assigned. Start from the shipped defaults and change only what annoys you.
- Custom actions. You can create an action tied to a specific keyboard shortcut. That's how you reach things that aren't in the built-in list, or restore an action if you've changed its default Anki shortcut (a few actions work by simulating that key press).
Setting your mappings: start blank, add four
Rather than editing the shipped defaults, wipe everything first and bind only what you press. It's less to keep track of, and nothing fires that you didn't ask for. In the config's Controls view:
- Blank every context. Start at the Default tab and work rightward through every tab after it (this includes Reviewing), clearing each assigned control so every mapping is blank. This throws out the defaults so no leftover binding surprises you later.
- Go to the Reviewing tab. It's the only context you need to begin with — it's what's active while you're grading cards.
- Press a button to find it. When you press a button on the controller, Contanki lights up the matching slot on screen, so you can see exactly where that physical button lives. Use this to pick the spot you want, then assign the action to it.
- Bind just these four for now — add more once it feels natural:
| Action | Where to put it |
|---|---|
| Good | A comfortable face button |
| Again | A comfortable face button |
| Undo | A comfortable face button |
| Suspend — pick Suspend Card | A D-pad direction |
Because everything else is blank, Hard and Easy now do nothing — which suits this manual's just-Again-and-Good advice. Add bindings later only as you find you want them.
These four don't include revealing the answer. In Anki the key that grades Good (Space) also flips the card on the question side, so a Good binding often doubles as your "show answer" — press once to flip, again to rate. If it doesn't flip that way for you, add a Show Answer binding in the same Reviewing tab.
On the phone or iPad (not Contanki)
Add-ons are desktop-only, so Contanki isn't involved on mobile — but you don't need it, because both mobile apps recognize controllers natively:
- AnkiMobile (iOS / iPadOS). Pair the controller in your device's Bluetooth, then in Anki open the gear → Preferences → Review → Gamepads and map buttons directly. No add-on, no install code.
- AnkiDroid (Android). Pair the controller, then Settings → Controls → Command mapping: pick the function you want, press the button you want it on. (Set 8BitDo pads to Android / D mode, or Switch / S mode presented as a Pro Controller.)
Troubleshooting
- Controller not detected. Check its mode first (8BitDo → try X, then D), then run Tools → Controller Options → Detect 8BitDo Controllers. Contanki uses one controller at a time, so unplug any others.
- Wrong Anki version. Contanki needs 2.1.66+. Update Anki, or grab a matching older Contanki build from GitHub.
Preparing for Phase 2
Finishing Foundations, or already through it? The rest of preclinical — the anatomy practicals, then the long runway to Step 1 — runs on two more decks and one power tool. Here's the order to pick them up:
- The Anatomy deck — a supplement for the Geisel practicals. Add it when anatomy starts (around Block 3), alongside Foundations; it runs on a different, unsuspend-as-you-go workflow rather than a cap.
- Moving to AnKing — the big community Step deck most students graduate to after Foundations. It has no built-in lecture order, so you drive the pacing yourself.
- Filtered decks — the tool you lean on to navigate AnKing and to cram before an exam. Optional in Foundations, close to essential here.
Two things worth reading before you switch over: the supplemental decks directory just below (download links, presets bundled), and how your settings change after Foundations — AnKing's tag-based structure needs a different pacing approach than Foundations' subdecks.
Supplemental decks
- AnKing (deprecated) — the community Step deck; where most students head after Foundations. See the full guide below.
- Anatomy — image-identification for the Geisel practical exams. See the full guide below.
- Radiology — imaging modalities and reading fundamentals.
- Histology — tissue and slide identification.
The Anatomy deck
The Anatomy deck is a supplemental resource for the Geisel anatomy practical exams. It's not part of Foundations and it's not lecture-aligned — where Foundations mirrors the lecture calendar, this deck is organized entirely around the official practical structure lists for Blocks 3–6. It starts when anatomy does (during Block 3), well after you've been running Foundations, so treat this as a second deck you add once anatomy begins — after you've cleared Block 2 (the I3 and heme material).
What's in it
It's two community image-identification decks tagged with a single shared scheme so you can study by exam station:
- ComprehensiveCadaver (CC) — ~5,000 cadaveric identification photos. Each card asks you to name a structure on a real prosection.
- DOPE — ~2,000 Netter-diagram cards. Each card is a whole labeled plate, so one card typically covers several structures at once (up to ~16).
Together they cover about 85% of the ~1,000 listed practical structures. That missing 15% is the single most important thing to understand about this deck, so it has its own section below — don't skip it.
The 15% not in the deck
About 148 structures on the official Geisel practical lists (Blocks 3–6) have no identification card in either ComprehensiveCadaver or DOPE. The practical can still test them — the deck just won't prepare you for them — so treat this list as a checklist of what to pick up elsewhere before each block's exam: lab time, a lecture atlas, or Complete Anatomy. It's grouped by the course director's own sections and sub-stations.
Block 3 — Thorax, sinuses, larynx (15)
- Thoracic wall: internal thoracic vessels
- Lungs, pleura & diaphragm: pleural cavity, costodiaphragmatic recess
- Mediastinum: tracheobronchial lymph nodes
- Sinus osteology: hard palate
- Nasal cavity & nasopharynx: nasal vestibule, eustachian tube opening
- Larynx: laryngeal vestibule, infraglottic cavity
Block 4 — Abdomen, pelvis (27)
- GI: rugae, duodenojejunal junction, ligament of Treitz, neck of pancreas, pancreatic incisure, ileocecal junction, ligament of Treves, rectosigmoid junction, transverse folds, anorectal flexure
- Arteries: esophageal artery, right gastroomental artery, left gastroomental artery, arterial arcades
- Pelvic osteology: linea terminalis, sacroiliac joint
- Female pelvis: suspensory ligament of ovary, anterior commissure, posterior commissure, inguinal canal
- Male pelvis: testicular lobules, root of penis, inguinal canal
- Female prosection: internal os, anterior vaginal fornix, posterior vaginal fornix
- Pelvic vasculature & nerves: S1–S3 anterior rami
Block 5 — Back, limbs, urinary (60)
- Osteology — vertebral column: vertebral canal, intervertebral discs
- Osteology — vertebrae: articular facets, costal facets
- Osteology — scapula: scapular notch
- Osteology — humerus: groove for ulnar nerve
- Osteology — ulna: head of ulna
- Osteology — hand & wrist: carpometacarpal joint, interphalangeal joints
- Osteology — pelvis: lunate surface
- Osteology — femur: medial epicondyle of femur, lateral epicondyle of femur, supracondylar lines
- Osteology — tibia & fibula: medial tibial condyle, lateral tibial condyle, intercondylar areas
- Osteology — foot: phalanges of foot
- Urinary system: gonadal vessels, renal medulla, perirenal fat, renal columns, medullary pyramids, renal sinus
- Back — spine prosection: posterior root, anterior root, posterior root ganglion
- Shoulder & pectoral region: triangular space, scapular notch, deltopectoral triangle
- Shoulder — prosection: fibrous shoulder capsule, glenoid labrum, biceps long head tendon
- Brachial plexus & axillary artery: lateral root of median nerve, medial root of median nerve
- Arm / cubital fossa / elbow — prosection: fibrous joint capsule
- Posterior forearm & dorsal hand: radial artery in snuffbox
- Extensor expansion: central band, lateral band, extensor hood
- Hand: common digital nerves, proper digital nerves, common digital artery, proper digital artery, carpal tunnel, fibrous digital sheath
- Hand — palm prosection: lumbricals
- Femoral triangle & anteromedial thigh: fascia lata, superficial inguinal lymph nodes, femoral canal, anterior branch of obturator nerve, posterior branch of obturator nerve, perforating branches of deep femoral artery
- Gluteal region / posterior thigh / hip — prosection: fibrous capsule, acetabular fossa, lunate surface
- Popliteal fossa / posterior leg / knee joint: articular surface of patella
- Anterior & lateral leg / foot / ankle — prosection: trochlea of talus, articular surface of tibia, articular surface of fibula, subtalar joint
Block 6 — Head, neck, brain, cranial nerves (46)
- Osteology: fontanelles
- Neck & thyroid: carotid sinus
- Cranium / meninges / vasculature — on donor: cavernous sinus
- Cranium / meninges / vasculature — on brain: lateral fissure
- Cerebral arterial circle: perforating arteries, lenticulostriate arteries, pontine arteries
- Face & scalp: inferior labial branch
- Brain topography — whole brain: cerebrum, interpeduncular fossa, cerebral peduncles, superior colliculi, inferior colliculi, basal pons, middle cerebellar peduncle, medullary pyramids, pyramidal decussation, olive, preolivary sulcus, postolivary sulcus, gracile tubercle, cuneate tubercle, obex, cerebellar vermis, flocculus
- Brain topography — bisected brain: septum pellucidum, anterior commissure, lamina terminalis, cerebellar tonsil, head of caudate
- Brain sections — coronal: lateral fissure, insular cortex, caudate nucleus, putamen, internal capsule, globus pallidus, hippocampus, amygdala
- Brain sections — axial: lateral fissure, insular cortex, caudate nucleus, septum pellucidum, internal capsule, putamen, hippocampus
- Eye: conjunctiva
How it's organized
There are no lecture subdecks here. Instead, every card is tagged by which practical station(s) its structures appear on, mirroring Dr. Lyon's groupings:
geisel_anatomy::block<N>::<section>[::<subsection>]

geisel_anatomy::block3::heart
geisel_anatomy::block5::osteology::skull
geisel_anatomy::block6::cranium_meninges_vasculature_lab::cerebral_arterial_circle
Use the geisel_anatomy:: tag namespace specifically in your searches. The DOPE cards also carry leftover AnatomySimplified::Netter::… tags from their origin deck; filtering on those would pull in untagged material. Always anchor on geisel_anatomy::.
Download & import
- Anatomy — CC + DOPE, Geisel-tagged
Import the same way as any deck (File → Import), and — as with Foundations — make sure its deck preset imports: a subdeck's options should read Anatomy (image-ID), not Default. The one thing no export can carry is the collection-wide FSRS switch, so if you haven't already turned FSRS on, do that now.
What the preset sets, and why it differs from Foundations
This is normal spaced repetition, same as Foundations — you learn structures, you review them, they persist. But two things differ, because the cards are fast image-recognition rather than dense cloze, and because the deck has no built-in lecture order:
| Setting | Anatomy value | Why |
|---|---|---|
| New cards/day | ~80 | Higher than the Foundations cap of ~50. Recognition cards are quick to review, so each new card costs less daily review time than a Foundations cloze — you can sustain a bigger intake. Still a cap, for the same reason Foundations has one: it keeps the daily load survivable. |
| Maximum reviews/day | 9999 | Never cap reviews — same rule as everywhere. Throttle intake, never the due pile. |
| FSRS / desired retention | on / 0.85 | Same as Foundations. These structures recur across blocks and into imaging, so retention is worth keeping. |
The preset controls how fast new cards arrive. What it can't do — and what Foundations gets for free from its date-prefixed subdecks — is control which cards are eligible, in step with what lab has actually covered. Foundations self-orders; here you do that gating yourself, by suspending and unsuspending stations. That's the workflow below.
The workflow: unsuspend stations as you cover them
Foundations sorts new cards into teaching order for free, because its subdecks are date-prefixed — you just study the parent deck. This deck can't do that: its only structure is tags, with no notion of what lab covered on a given day. So you gate the material yourself, and the simplest tool is suspend/unsuspend.
First, suspend the whole deck — right after you import it. This is a required setup step, not something the download does for you: an .apkg can't carry suspended state, so however the deck was suspended when it was exported, every card lands in your collection unsuspended. Re-apply it yourself once. In Browse, click the Geisel Anatomy deck, select all (Ctrl/Cmd+A), and Toggle Suspend (press J). The whole deck goes gray and nothing shows — the clean slate you actually want.
From there it's unsuspend-as-you-go. As lab covers a station, you unsuspend that station's cards and they enter your normal daily study — where the preset's ~80/day cap paces them for you. Nothing to rebuild; unsuspending is permanent until you change it.
Why the manual suspension: Anki's .apkg format doesn't preserve the suspended flag — cards always import unsuspended, regardless of their state at export. So no deck can ship pre-suspended; the one-time suspend-all is what creates the "hidden until you reveal it" behavior this deck depends on.
A lecture usually covers a few stations at once (say heart and mediastinum). In the Browse window, search those tags, select all, and unsuspend:
Browse → search:
      deck:"Geisel Anatomy" (tag:geisel_anatomy::block3::heart OR tag:geisel_anatomy::block3::mediastinum)
    Select all (Ctrl/Cmd+A) → right-click → Toggle Suspend  (or press J)
From then on those cards flow through your normal reviews automatically — you study the Geisel Anatomy deck like any other, and only unsuspended stations appear. Unlike AnKing, there's no high/low-yield tagging to slice by, so you never need a filtered deck for normal studying; unsuspend-as-you-go is the whole system.
One exception — cramming before a practical. If you want to hammer a whole block in the days before an exam regardless of schedule, build a filtered deck (tag:geisel_anatomy::block3) with Reschedule OFF so the cram doesn't distort your intervals. That's the only place a filtered deck earns its keep here — for everyday study, stick to unsuspend.
Moving to AnKing
After Foundations, most students move to the AnKing Overhaul deck — a large, community-maintained, subscription-model deck that covers preclinical medicine and maps to Step 1 and Step 2 resources. Here, we provide a deprecated version of the AnKing Step Deck. That means it is no longer being updated. While significant change to the material tested is slow, you can purchase a subscription to AnkiHub for the most up-to-date version of the deck.
Origin
The AnKing Step deck descends from a lineage of community decks: Brosencephalon (~2015), then the more comprehensive Zanki (~2016–2017) and offshoots like Lightyear. The AnKing team consolidated these into a single standardized, continuously maintained "Overhaul" deck with consistent tagging, note types, and resource links — shifting the model from static decks to versioned, community-updated releases.
What changes
- One big deck, not lecture subdecks. AnKing is organized by subject and tagged extensively, with no built-in teaching order. You pull cards to study as you cover topics, using tags — a solid habit is to watch a Sketchy or B&B video and do its associated cards right after, working from the Bootcamp or B&B parent tags plus SketchyMicro and SketchyPharm as needed.
- You build the pacing yourself. Foundations metered out new cards for you through date-prefixed subdecks; AnKing has none, so you supply the structure through filtered decks or by pulling tags into your own subdecks. Both strategies below.
First: suspend the low-yield cards
Whatever method you pick, do this before anything else. AnKing is far larger than you need, and its cards carry yield subtags. Suspend the low- and lower-yield cards up front so they never enter your queue — it's the single biggest lever on keeping the deck manageable, and it applies to both strategies below. You can always unsuspend a slice later if you decide you want it.
- Navigate to the browser
- In the left-hand sidebar, find and expand
tag:#AK\_Step1\_v12::#Low/HighYield - Select
tag:#AK\_Step1\_v12::#Low/HighYield/4-LowerYield - Click on a card in the center console
- Press Ctrl/Cmd+A to select all
- Press Ctrl/Cmd+J to suspend
- Repeat for
tag:#AK\_Step1\_v12::#Low/HighYield/5-LowYield
Expect to see 0 cards at first — this is correct, not a broken import. Unlike Foundations, AnKing has no date-prefixed subdecks feeding new cards in teaching order, so studying the deck out of the box surfaces nothing to pace. Its preset caps how fast new cards arrive, but not which ones are eligible — and after you've suspended the low-yield tiers above, even more is hidden. You populate your own queue tag by tag as you cover topics, using one of the two strategies below. An empty AnKing deck on day one means it imported fine; it's waiting for you to pull material in.
Two ways to study it
Pick whichever fits you best — they're not mutually exclusive.
Strategy 1 — Filtered decks only
Leave every card in the one AnKing deck and drive all studying through filtered decks built on card state plus tags, rebuilding them as you progress:
- Reviews only:
deck:AnKing is:dueclears everything that has come due, across all topics. - New cards for a topic:
deck:AnKing tag:<topic> is:newintroduces new cards only for the topic you've just covered. - Both at once:
deck:AnKing (is:due OR (tag:<topic> is:new))— clears all due reviews while limiting new cards to the current topic.
Replace <topic> with the tag you're working through (a Sketchy, B&B, or Bootcamp subtag); AnKing tags are nested, so you'll often want a wildcard like tag:*pharm*. As always with filtered decks, state the card state explicitly — see Filtered decks for the mechanics and the silent-pull trap.

B&B::06_Cardio tag. (is:due OR is:new) pulls everything you owe plus everything you haven't met, but not reviews scheduled for a future date, so you get one working pile to grind down and nothing that isn't ready yet.Strategy 2 — Tags into subdecks
Recreate the Foundations model. As each topic comes up, move that tag's cards into a subdeck you've made and let the preset's new-cards/day cap pace them — the same throttle Foundations used. In the Browse window, search the tag, select all, and right-click → Change Deck to move them into your subdeck; from then on you just study the parent deck and the cap meters out new cards. This trades a little setup for the same hands-off, one-button flow Foundations gives you, and it's the better fit if filtered-deck queries feel fiddly.
Filtered decks
A filtered deck temporarily gathers cards matching a search; you study them, and they return to their home deck afterward. The basic workflow doesn't need them — studying the parent deck already sorts everything into teaching order. But they're the power workflow: more flexible, at the cost of having to rebuild them and spell out card states in the query. They're also one of the main ways to navigate the enormous AnKing deck (see the AnKing strategies).
What they're good for
- Custom new-card ordering — pull new cards up to the lecture you've reached, in teaching order:
deck:"Geisel Foundations" is:newwith Order = Order added. - Targeted exam prep — everything due for one benchmark:
deck:"Geisel Foundations::Benchmark 1" is:due - Cramming a slice — all cards for a subject or benchmark in one session:
deck:"Geisel Foundations::Benchmark 1" (is:due OR is:new) - Catching up — a two-deck system that stops a backlog from snowballing. First build a current deck for cards that just came due, so newly-due cards never pile onto the backlog:
deck:"Geisel Foundations" is:due prop:due>=-1(due today or yesterday) — study it every day. Then build a second overdue deck for the backlog itself:deck:"Geisel Foundations" is:due, with the build limited to 100 cards, chipped away in daily chunks. Build the overdue deck second on purpose: the current deck has already claimed the recently-due cards (a filtered deck can't pull cards already sitting in another), so the overdue deck naturally collects only the older backlog.
The common trap: a filtered deck with no card-state qualifier (just deck:"Geisel Foundations::Benchmark 1") pulls in a way you probably didn't intend, and does it silently — no error. Always say what state you want: is:due, is:new, or (is:due OR is:new). This fragility is exactly why the basic workflow uses the parent deck instead.
Building one
Tools → Create Filtered Deck. See "Searching" in the Anki Manual for the query syntax.

deck:"Geisel Foundations::Benchmark 1" is:due gathers only the cards that have come due (no new ones), the 9,999 limit takes the whole due pile in one go, and retrievability, ascending serves the cards you're least likely to still remember first.The order ("cards selected by") controls both which cards are kept when you hit the limit and the sequence you see them in. Sensible defaults: Order added for new cards you want in teaching order (this is what makes the custom-new-card recipe above work), and retrievability, ascending for a review backlog or an exam cram — it surfaces the cards you're most likely to have already forgotten first, which is exactly what you want when digging out (older, pre-FSRS Anki calls this ordering relative overdueness). For a pure cram where order doesn't matter, Random is fine.
The important rule: reschedule deliberately
The "Reschedule cards based on my answers" option decides whether your grades in the filtered deck affect the real schedule.
- For normal review or catch-up of due cards, leave rescheduling ON — your answers should count.
- Cram workflows should turn it OFF so a cram doesn't alter your intervals.
Empty, rebuild, or delete the filtered deck when you're done.
That's the whole toolkit for the rest of preclinical — Anatomy for the practicals, AnKing for the long game, filtered decks to steer them. From here it's practice: keep the daily habit going, and if a term or a situation trips you up, the glossary and FAQ are in Help — as is Contribute, if you want to make the decks better for the next class.
Glossary
Terms this manual and Anki's own screens throw around, in one place:
| Term | What it means |
|---|---|
| Interval | How long until a card is next due. Grading Good lengthens it; Again collapses it. |
| Lapse | Failing a card you'd previously learned (rating it Again when it wasn't new). Enough lapses makes a leech. |
| Leech | A card failed repeatedly (8× by default); Anki tags and auto-suspends it. See the FAQ. |
| New / learning / young / mature | A card's life stage: new (never studied), learning (in its first day or two of steps), young (interval under 21 days), mature (21 days or more). |
| Suspend | Pull a card out of rotation indefinitely. Reversible, never deletes anything. The backbone of the Anatomy workflow. |
| Bury | Hide a card only until tomorrow — a one-day snooze, not a suspend. |
| Ease | The old SM-2 "how easy is this card" multiplier. FSRS replaces it; you no longer tune it by hand. |
| Retention | The share of cards you want to still recall at review time. This deck ships at 0.85. |
| Cloze | A card that blanks out part of a sentence for you to recall (the deck's main card type). |
| Filtered deck | A temporary deck built from a search; cards return home when you're done. See Filtered decks. |
| Preset | A named options group several decks can share; change it once, every deck on it updates. |
FAQ
I missed a few days (or a week, or a month) of reviews. What do I do?
Same answer at any scale: set new cards to 0, then clear the due pile in manageable chunks over a few days. Don't binge it all at once, and don't delete cards to make the number drop. For Foundations the by-lecture structure keeps the backlog bounded; on the big AnKing deck, a due/overdue filtered deck can help you triage.
A card has an error. How do I report it?
Flag it in Anki (press Ctrl/Cmd+1) so you remember, then use the Contribute steps. Include the card text and the fix.
Can I add my own cards or edit existing ones?
Yes to both. Cards you add yourself are never touched by updates. Editing existing cards is encouraged too — reworking a card in your own words is part of how it sticks. One thing to know: if you edit an existing card and a maintainer later revises that same card, your version of that field can be replaced on the next import (your scheduling and history are never affected). In practice this rarely matters — the point of editing to learn is the editing, not keeping the text forever. And if your edit is a genuine fix, don't keep it to yourself: send it through Contribute so it reaches everyone and becomes permanent by living in the deck itself.
My sync isn't working.
Almost always: you edited on two devices without syncing between them, or you're not on the same AnkiWeb account. Sync at the start and end of every session. If you hit a conflict, choose the device with your most recent reviews.
What's the difference between Again, Hard, Good, and Easy?
Again = you didn't know it (it comes back soon). Good = you knew it (normal interval). Hard and Easy nudge the interval down or up. Keep it simple: use Again and Good, and let FSRS do the rest.
Do I need AnkiHub or a paid subscription?
For Foundations, no. The desktop app, a free AnkiWeb account, and the shared deck are everything you need. AnkiHub becomes relevant only if you move to AnKing and want its managed updates. (On iOS, the one paid piece is the AnkiMobile app itself — a one-time purchase, not a subscription.)
Anki says I have 0 cards due, but I feel behind.
That's the system working — if nothing's due, you're caught up. "Feeling behind" usually means you've been cramming and expect a big daily pile. Trust the schedule; do new cards if you want to get ahead, but 0 due is a good thing.
I think I broke something / deleted the wrong cards. Can I undo it?
Usually yes — don't panic and don't start deleting things to "clean up." First try Ctrl/Cmd+Z; Anki's undo reaches back further than you'd expect. If the damage is bigger, Anki keeps automatic backups (every time you close or sync, ~30 kept). Restore one via File → Switch Profile → Open Backup, then pick a backup from before the mistake — note you'll lose changes made after that point, so choose the most recent good one. If your collection looks empty but AnkiWeb has your cards, don't force a sync in the wrong direction — see Sync, every time for which way overwrites which.
Automatic backups live on your laptop, so they won't save you if the laptop dies. For real insurance, occasionally do File → Export as an Anki collection package (.colpkg) with media included, and keep it somewhere else. Syncing to AnkiWeb covers most of this for free.
Contribute
The deck stays good because students keep it good. Whether you caught a typo, want to author cards for a whole lecture, or want to help maintain the project, here's how.
- Suggest an edit — report a card error or propose a new card
- Join the maintainers — help audit, build, and update the decks
Reporting an error
The most useful report includes:
- The card text, copied from Anki's edit view (don't paraphrase).
- What's wrong, and what it should say.
- The source — which lecture/slide, if you know it.
Flag the card (Ctrl/Cmd+1) at the same time so you don't lose track of it, then submit it through Suggest an edit.
Suggesting new cards
New cards should match the deck's conventions so things stay consistent:
- One fact per card, cloze-deletion style.
- Bold the context term, cloze the thing being tested.
- Extra field for a mnemonic or clarification.
- Source line naming the lecture and subsection.
Send proposed cards through Suggest an edit; a maintainer formats and verifies them before a release.
When a card conflicts with a slide
The slide wins — the course content is the source of truth, and the card should be corrected to match. Flag those promptly so the fix reaches everyone before the next benchmark.
About
Anki @ Geisel is a student-built guide and shared deck for using spaced repetition at the Geisel School of Medicine. It exists so each class doesn't have to rebuild the same cards and re-learn the same setup from scratch.
Not official. This is a student project — it is not endorsed by the Geisel School of Medicine. Always cross-check a card against the original lecture material when something looks off.
Built and maintained by Geisel students. To reach the maintainers, report an error, or get involved, see Contribute.